I Spent Two Weeks Testing AI Video Background Change Prompts — Here’s What Actually Works
My first attempt was a disaster.
I was trying to put together a product demo video for a freelance client. The original footage had my messy desk in the background — half-eaten snacks, a pile of laundry, the works. I figured I’d just swap the background using an AI tool. Simple, right?
Three hours later, I had a video where the “clean office background” kept flickering in and out, my hands had phantom edges around them, and at one point my left shoulder completely disappeared. The client was not impressed.
That experience sent me down a rabbit hole of testing different AI video background change prompts, tools, and workflows. I’ve since done this for dozens of projects — explainer videos, social content, remote interview recordings — and I’ve learned a lot about what makes a prompt actually work versus what gives you garbage output.
So let me share everything I’ve figured out, the hard way.
Why Your Background Change Prompt Actually Matters
Most people treat these prompts like magic keywords — just type “replace background with a modern office” and expect perfection. That’s not how it works.
The prompt you write is giving the AI a set of instructions about what to do with light, depth, edge detection, and environment. A vague prompt gives the model too much guesswork to do. A specific, well-structured prompt gives it the context it needs to make decisions that look realistic.
Think of it like giving directions to someone who’s never been to your city. “Go downtown” will get you lost. “Head north on Main Street for two blocks, turn left at the coffee shop” actually gets you somewhere.
The Tools I’ve Used (And Which Ones Actually Cooperate)
Before we talk prompts, quick context on the tools I’ve personally tested:
Runway ML (Gen-3 Alpha) — This is my go-to for serious work. It handles motion well and responds very well to detailed prompts. The background replacement isn’t a single-click feature; you feed it your source video and describe what you want.
Pika Labs — Better for shorter clips, more stylized results. Good if you want something artistic rather than photorealistic.
Kling AI — Surprisingly solid for mid-length clips and handles lighting transitions reasonably well.
Adobe Firefly (video features) — Still catching up, but the integration with Premiere Pro makes it useful if you’re already in that ecosystem.
CapCut’s AI Background — The most accessible for non-technical users. Limited but fast.
Each tool processes prompts differently, but the core principles I’ll share below apply across all of them.
What a Strong Background Change Prompt Looks Like
Here’s a real prompt I used recently for a talking-head video that needed a clean home office look:
“Replace the existing background with a bright, modern home office interior. Warm natural light coming from the left side, slightly diffused. Bookshelf with neutral-colored books visible in the background, slightly out of focus. The subject’s hair and clothing edges should blend naturally with the new environment. Maintain consistent lighting on the subject’s face to match the warm ambient light of the room. Background should appear at a depth of roughly 8–10 feet behind the subject.”
Notice what’s in there:
Specific environment — not just “office” but “home office interior” with details about what’s in it
Lighting direction — where the light is coming from matters enormously for whether the swap looks believable
Depth specification — giving the AI a sense of how far back the background should sit helps with blur and perspective
Edge behavior — explicitly mentioning hair and clothing edges reduces that ghosting artifact problem I mentioned earlier
Consistency note — reminding the model to match lighting between subject and background
That last one is something most people skip, and it’s the reason you end up with someone who looks like they were photographed under fluorescent lights standing in front of a sunny beach.
Step-by-Step: Building Your Prompt from Scratch
Step 1: Describe the environment type first
Start with the broad strokes. Is it indoor or outdoor? What’s the general vibe?
Examples:
- “A contemporary co-working space with exposed brick walls”
- “An outdoor rooftop terrace in golden hour light”
- “A minimalist white studio with soft diffused lighting”
Step 2: Specify the light source and quality
This is non-negotiable. Light is what makes or breaks believability.
- Hard light vs. soft light (direct sun vs. cloudy day/studio light)
- Direction: front, side, back, overhead
- Color temperature: warm (golden, orange tones) vs. cool (blue, gray tones)
Example addition: “…soft diffused light from a large window on the right side of the frame, casting gentle shadows to the left”
Step 3: Add depth and background elements
Tell the AI what’s actually in the background and how far away it is. Vague backgrounds look fake because the depth cues are off.
“Background elements visible: a large indoor plant to the left, blurred bookshelves straight ahead at approximately 12 feet, warm ambient overhead lighting”
Step 4: Address edge handling explicitly
This is the big one that most tutorial videos don’t mention. The edges between your subject and the new background are where everything falls apart.
Add something like: “Subject edges, including hair, clothing, and hands, should integrate naturally with the new background environment. Avoid harsh cutout edges or haloing artifacts.”
Step 5: Note consistency requirements
“Ensure the lighting and color temperature on the subject’s face and body match the ambient environment. No visible compositing seams.”

Prompt 1
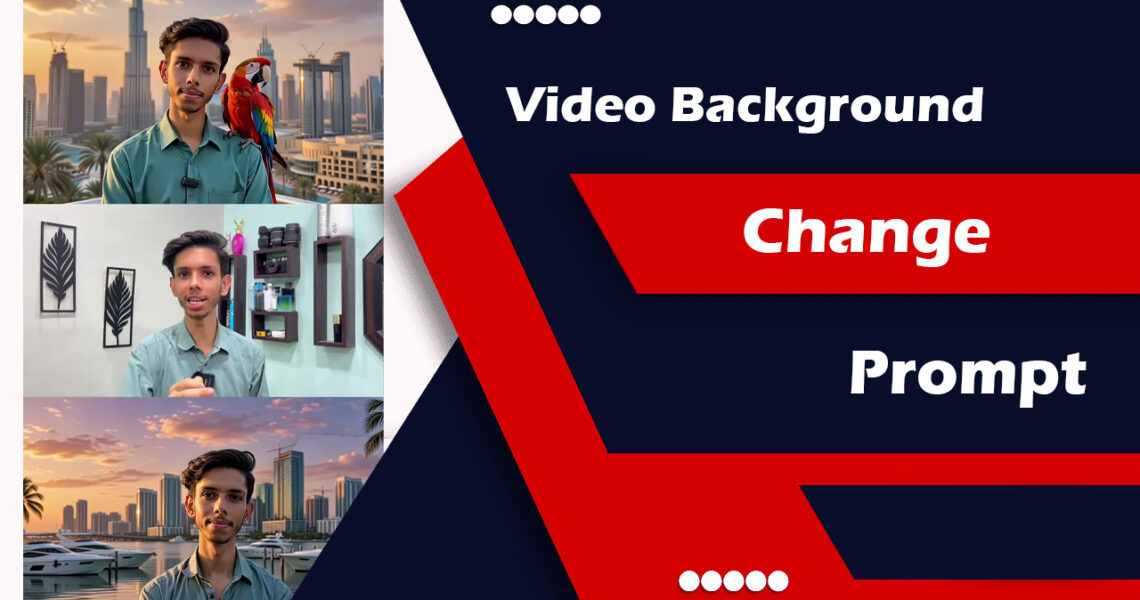
[10:44 PM, 6/17/2026] Shiv tiktok: Replace the entire background of my original video with a breathtaking Miami sunset waterfront scene while keeping my face, skin texture, hairstyle, facial features, body shape, clothing, accessories, pose, expressions, movements, and camera perspective completely unchanged. Create an ultra-realistic luxury Miami atmosphere featuring a vibrant orange, pink, purple, and golden sunset sky reflecting on the ocean. Add realistic palm trees gently moving in the breeze, luxury yachts docked in the marina, modern glass skyscrapers in the distance, premium waterfront architecture, and subtle city lights beginning to illuminate as sunset approaches evening. Maintain perfect subject isolation and edge detection around hair, face, hands, clothing, and accessories. Do not alter facial structure, skin tone, age, identity, clothing colors, clothing texture, or any details of the original subject. Preserve every facial detail with 100% identity accuracy. Match the lighting naturally so the warm golden sunset light interacts realistically with the subject. Add cinematic golden-hour highlights, realistic shadows, natural ambient reflections, and professional color grading. Ensure realistic depth of field, atmospheric perspective, and seamless blending between subject and background. The final result should look as if the video was originally filmed in Miami during a luxury sunset photoshoot. Extremely photorealistic, cinematic, HDR quality, 8K detail, professional film production look, natural motion consistency, no artifacts, no face modification, no clothing modification, no distortion, no flickering, no oversmoothing, no AI-generated appearance. Style: Ultra-realistic luxury Miami sunset, cinematic golden hour, Hollywood-quality color grading, premium travel influencer aesthetic, realistic environmental lighting, high dynamic range, professional videography, seamless background replacement. [10:45 PM, 6/17/2026] Shiv tiktok: Use the uploaded video as the source. Keep the person’s face, hairstyle, skin texture, facial features, body proportions, clothing, microphone, pose, eye movement, lip sync, expressions, and camera framing 100% unchanged throughout the entire video. Do not modify identity in any way. Replace the indoor room background with an ultra-realistic Dubai skyline during golden sunset. The iconic Burj Khalifa should be clearly visible in the background, surrounded by luxury skyscrapers, modern architecture, and warm sunset reflections. The sky should feature rich orange, golden, pink, and purple tones with cinematic clouds and atmospheric depth. Place a large, vibrant exotic parrot naturally perched on the subject’s right shoulder. The parrot should look realistic with detailed feathers, natural blinking, subtle head movements, and accurate lighting matching the sunset environment. The bird must remain stable on the shoulder and interact naturally with the subject’s movement. Apply realistic golden-hour lighting on the subject and parrot, creating natural highlights, shadows, rim light, and reflections. Ensure seamless compositing, perfect hair-edge masking, realistic depth of field, and professional color grading. Create a luxury cinematic Dubai atmosphere with premium travel-film aesthetics, smooth motion, HDR quality, realistic environmental lighting, shallow depth of field, and Hollywood-level production value. Ultra-realistic, cinematic sunset, Dubai skyline, Burj Khalifa visible, luxury lifestyle aesthetic, natural motion consistency, 8K detail, professional videography, no face change, no clothing change, no identity alteration, no artifacts, no flicker, no distortion, photorealistic quality.
The Prompts That Actually Solve Specific Problems
Here are some ready-to-adapt prompts for common situations:
For a professional interview setting: “Replace background with a clean corporate office interior. Neutral gray or navy walls. Soft, even artificial lighting from the front and sides. Small potted plant visible out of focus to the right. Subject should appear naturally lit and integrated into the space. Depth: 10–15 feet to back wall.”
For a lifestyle/social content vibe: “Replace background with a bright Scandinavian-style living room. Large windows with natural daylight on the left. White walls, minimal wooden furniture slightly out of focus. Warm, airy atmosphere. Subject lighting should reflect warm natural daylight coming from the window side.”
For a tech/startup aesthetic: “Replace background with a modern open-plan tech office. Exposed ceiling, concrete walls, soft warm pendant lighting. Multiple desks and monitors visible and out of focus in the background at 12–20 feet. Consistent with a startup or creative agency environment. Natural integration of subject edges.”
For a creative/artist aesthetic: “Replace background with a creative studio space. Slightly warm, painterly feel. Large canvas or artwork partially visible to the left, out of focus. Natural light from overhead skylights. Subject should appear as if naturally standing in this space, with soft shadows consistent with the overhead lighting.”
Mistakes I Made (So You Don’t Have To)
Mistake #1: Keeping the original lighting on the subject
If your source video was shot under fluorescent office lighting and your new background is a sunset beach, it’s going to look wrong no matter how good the background swap is. Either reshoot with better lighting, or pick a background that plausibly matches your existing light conditions. I’ve started always including: “Background lighting environment should be consistent with the existing ambient lighting on the subject.”
Mistake #2: Describing backgrounds that are too busy
A background with lots of fine detail — intricate brickwork, busy bookshelves, patterned wallpaper — looks fake much faster than a clean, simple background. Simpler is almost always better. I now default to backgrounds with large smooth surfaces (walls, windows, greenery) rather than detailed textures.
Mistake #3: Not accounting for motion
Static backgrounds look fine on a still frame but weird when there’s camera movement or the subject moves through the frame. Add: “Background should respond naturally to any camera motion or subject movement within the scene.” Not all tools honor this, but the ones that do (like Runway) produce noticeably better results.
Mistake #4: Expecting it to work on hair right away
Curly hair, flyaways, or any loose strands are the AI’s nightmare. I’ve learned to specifically prompt for this: “Pay special attention to hair edges — stray hairs and soft hair boundaries should blend naturally rather than appear as a hard mask.” And honestly, for really complex hair, I sometimes do a manual touch-up afterward in DaVinci Resolve or CapCut.
Mistake #5: Using generic background descriptions
“Replace with an office background” is like asking a chef to “make something tasty.” You’ll get something, but probably not what you imagined. The more specific your description, the better the output.
When to NOT Use AI Background Replacement
Real talk: there are situations where this just isn’t the right tool.
If the original footage has bad edges — like the subject wearing clothes that are the same color as the original background — no prompt in the world will fix the fundamental data problem. The AI can’t detect what it can’t see.
If the original lighting is particularly harsh, inconsistent, or mixed-color, the composite will look off no matter what. It’s faster to reshoot in a better spot.
And if you need pixel-perfect results for a broadcast or high-end production, AI video background swap is still not quite there. Green screen with proper keying in post is still more reliable for that tier of work.
But for social content, YouTube, corporate Zoom recordings, freelance deliverables, and most everyday video work? These prompts, applied consistently, get you 80–90% of the way there without a production setup.
One Last Thing
The biggest shift in my results came when I stopped thinking of these as “background change” prompts and started thinking of them as “lighting and environment integration” prompts. The background itself is the easy part. Getting the subject to look like they genuinely belong in that background — same light, same depth cues, same color temperature — that’s the actual craft.
Once I started writing prompts with that frame in mind, my outputs went from “obviously AI-generated” to “wait, where was this filmed?”
And that’s really the bar you’re aiming for. (mix2vfx)