I didn’t believe AI image editing could actually be useful until I tried these five prompts. No design skills, no Photoshop, no expensive software — just the right words in the right order.
A few months ago, a friend sent me a photo of himself holding a Samsung phone and asked me to make it look like an iPhone for a reel thumbnail. I laughed and said I’d need Photoshop for that. Twenty minutes later, I’d done it with a single AI prompt and I genuinely could not tell the difference.
That’s when I fell down the rabbit hole of AI image prompting. What I found was that most people are barely scratching the surface — typing vague one-liners and getting mediocre results. The real magic happens when you give the AI proper, detailed instructions. These five prompts are the ones I keep coming back to.
Prompt 01
Transform this image into a breathtaking ultra-realistic foggy forest masterpiece. Add dense natural white fog covering the entire environment, creating a mysterious and cinematic atmosphere. Apply rich forest-inspired color grading with deep emerald green, dark teal, moss green, and earthy brown tones. Enhance the trees, foliage, and background elements to resemble a lush enchanted forest hidden in the mist. Introduce soft volumetric light rays subtly penetrating through the fog, creating depth and realism.Increase overall image quality to ultra-high-definition 4K resolution with razor-sharp details, HDR enhancement, realistic textures, balanced contrast, and natural color harmony. Improve shadows, highlights, and dynamic range while maintaining a realistic appearance. Add a moody woodland aesthetic, dreamy fog layers, atmospheric perspective, and professional cinematic photography grading. The final result should look like a premium DSLR forest photograph captured during a cold misty morning with ultra-realistic details, immersive depth, soft natural lighting, and stunning visual quality. Style: Cinematic Forest Photography, Moody Nature, Dense Fog Weather, Volumetric Lighting, HDR, Ultra Realistic, Professional Color Grading, 4k Quality, DSLR Shot, Atmospheric Depth, Photorealistic
Prompt 02
Create a premium Kerala sunrise visual featuring [SUBJECT] in [LOCATION], surrounded by authentic Kerala landscapes during the peaceful early morning hours (5:30-6:30 AM). Capture the calm beauty of dawn with soft golden sunlight gently rising through light morning mist, fresh dew-covered grass, subtle fog drifting across fields, cool clean air, and a naturally tranquil atmosphere. Maintain realistic Kerala vegetation, natural colors, authentic textures, soft diffused lighting, gentle shadows, realistic reflections, smooth highlight roll-off, and rich dynamic range. The environment should feel fresh, peaceful, and emotionally uplifting, exactly like a real Kerala village at sunrise. Photographed using an iPhone 17 Pro with a [LENS] lens profile, featuring natural depth of field, premium mobile photography quality, and true-to-life color science. Color palette: fresh emerald greens, warm sunrise gold, soft misty whites, muted earthy browns, gentle sky blues, and natural morning tones.
Prompt 03
Change Android Phone to iPhone
Best for: Content creators, thumbnails, reels
This was my gateway prompt. If you’re a creator who shoots on Android but wants that premium iPhone aesthetic in your content, this is genuinely game-changing. The key is giving the AI every detail — perspective, lighting, finger placement — so it doesn’t just slap a phone shape onto the image.
Replace the phone in the boy/girl's hand with a realistic Apple iPhone 17 Pro Max. The phone should have a sleek premium design with flat edges, ultra-thin bezels, and a large triple-camera module with LiDAR sensor in the top-left corner. Use a natural metallic finish (like titanium or graphite), with the Apple logo centered on the back. Phone must be match with the reference image or more clear results. Match the perspective, hand position, lighting, shadows, and reflections perfectly so it looks naturally held in her hand. Maintain correct finger placement wrapping around the device. Add realistic screen reflection or subtle glare consistent with the bathroom lighting. Ensure photorealistic quality high detail, and seamless blending so it appears like the original photo was taken with the iPhone. Keep the background, person, pose, and composition unchanged. (Please use reference iPhone image)Pro tip: Always attach a reference iPhone image alongside this prompt. The AI uses it to match the exact model, angle, and finish — without it, results can be hit or miss.
The first time I ran this, I was shocked at how it preserved the hand position and matched the room lighting onto the phone screen. It looked like the photo was taken with an iPhone from the start. For YouTube thumbnails and Instagram content, this alone is worth learning.
Prompt 04
Realistic Outfit Changing
Best for: Fashion creators, before/after posts, styling
I used this one for a cousin who had a stunning outfit she wanted to “try on” over a photo from a different occasion. What makes this prompt work is the golden hour lighting instruction — it tells the AI to blend the new outfit naturally into the existing photo’s warmth and tone instead of making it look pasted on.
Change the entire outfit in the first photo to match the outfit in the second photo. It should be realistic, (golden hour lighting) do not change anything else. GENERATE IMAGE NOW. (Make sure you have to add reference Outfit image to generate realistic outfit changing photo)Important: You need two images for this — your base photo and a reference outfit photo. Upload both before running the prompt. The AI matches fabric texture, drape, and fit based on the reference.
The results are most impressive when the base photo already has warm, natural lighting. Indoor fluorescent light photos tend to clash more with the golden hour instruction. Outdoor or window-lit base photos blend almost seamlessly.
Common mistake: Using a flat lay or mannequin outfit photo as your reference. Use a photo of someone actually wearing the outfit — it gives the AI better context for how the fabric falls and fits on a body.
Prompt 05
Best Hairstyle Suggestion
Best for: Makeovers, salon visits, personal styling
Before my sister’s wedding last year, I spent hours on Pinterest trying to figure out what hairstyle would work for her face shape. I wish I’d had this prompt then. It doesn’t just suggest styles — it analyzes your specific face structure and generates visual examples so you can actually see yourself in each style.
Here is my face photo. Analyze my face shape, forehead size, jawline, and overall hair texture. Based on this analysis: 1. Suggest at least 5 modern and trending hairstyles that will suit me best. 2. For each hairstyle, explain why it matches my face shape and personality. Provide example hairstyle images (generated, not stock photos) so I can visualize each look. 1. Also recommend whether I should go for short, medium, or long hair length. 2. Add quick styling and maintenance tips for each suggested hairstyle. Important: Along with text explanation, generate clear hairstyle example images adapted to my face photo. GENERATE IMAGE NOW.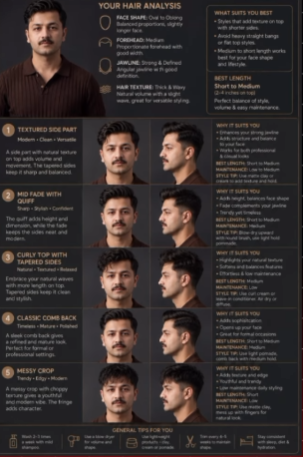
What surprised me was how accurately it read face shape from a regular selfie. It flagged a strong jawline and recommended styles that added volume at the crown — which matched almost exactly what her hairstylist told her in person later. Great for going into a salon with a clear idea instead of just saying “something nice.”
Best practice: Use a well-lit, front-facing photo with hair pulled back or clipped away from your face. The clearer the facial structure, the more accurate the analysis and suggestions.
Prompt 06
Android Camera Photo to Cinematic Quality
Best for: Portrait photography, social media, creative edits
This is the most creative prompt on the list. It takes an ordinary photo and transforms it into something that looks like a film still — moody heritage room, golden patterned light, cinematic depth. I've seen people use this for profile pictures and the results genuinely look like professional editorial shoots. There are three variations depending on the mood you want: Prompt A — Quick Cinematic Transform Convert the above image into ultra realistic portrait of only boy/girl should be sitting in floor in dark heritage house room there should be pattern golden lights should fall on her face. He/she should be in elegant makeup and stylish hairstyle he/she should be sitting in. GENERATE IMAGE NOW. Prompt B — Side Profile Cinematic Portrait. Ultra-realistic cinematic portrait of a young Indian man/woman (same exact face, identity preserved), sitting gracefully on the floor inside a dark vintage heritage house room with carved wooden pillars and textured walls. He/She is in a side profile pose, slightly turning her face toward the camera. GENERATE IMAGE NOW. Prompt C — Full Cinematic Scene (Most Detailed) Ultra-realistic cinematic portrait of a young Indian man/woman (exact same face preserved), sitting on the floor of a dim heritage room with antique textures and moody background. He/She is sitting with her legs folded, looking slightly downward with a soft smile, one hand resting gently on her lap. Golden patterned light creates intricate highlights across her face. Hair tied in a loose low bun with soft face-framing strands. Mood: soft elegance, traditional grace Lighting: warm golden rays, shadow play, photorealistic, 8K Golden patterned sunlight falls across her face and saree through a jali window, creating artistic shadow patterns. Mood: royal, calm, timeless Lighting: warm cinematic, chiaroscuro, ultra-detailed, 8K GENERATE IMAGE NOW. Start with Prompt A to test how the AI handles your photo, then work up to Prompt C if you want the full cinematic treatment. Prompt C produces the most dramatic results but needs a clear, well-lit base photo to preserve the face accurately.Pro tip: Prompt C works best with a portrait-oriented base photo. Landscape or group photos lose the individual face detail in the cinematic transformation.
Prompt 07
Old Blurry Image to Ultra HD Quality
Best for: Restoring old family photos, damaged images
This one hits differently. I used it on a scanned photo of my grandparents from the 1970s — grainy, slightly torn, and faded. What came back was the same photo, same expressions, same composition, but sharp enough to print and frame. I actually teared up a little.
Enhance this old blurry image into ultra high-definition 4K/8K quality. Preserve the original face, identity, expression, and all facial features exactly as they are. Do NOT alter or beautify the face, do not change age, skin tone, or structure. Sharpen details, improve clarity, remove blur, noise, and grain while maintaining natural textures. Restore fine details like skin texture, hair strands, eyes, and fabric without over-smoothing. Improve lighting, contrast, and dynamic range naturally. Enhance colors to be accurate and realistic (no oversaturation). Upscale resolution to ultra HD (4K or 8K) with crisp edges and high detail. Fix motion blur and focus issues while keeping the image realistic. Maintain original composition, background, and proportions. No artificial changes, no added elements, no distortion. Final result should look like a high-quality DSLR photo, ultra-realistic, sharp, clean, and natural.
The “do NOT alter or beautify the face” line is the most important part of this prompt. Without it, AI tools have a tendency to smooth skin and adjust features — which is the last thing you want when restoring a historical or family photo. You want the person to look like themselves, just sharper.
What works best: Photos where the face is at least partially visible and not fully obscured by blur. Completely black or white-blown areas are harder to recover, but grain, general blur, and fading restore beautifully with this prompt.
Watch out for: Some AI tools will still subtly alter facial features even with the preservation instruction. Always compare the output side-by-side with the original to check that the identity is intact before saving.
One thing to keep in mind
These prompts work across tools like ChatGPT (with image generation), Adobe Firefly, Midjourney, and other AI image editors — but results vary by platform. ChatGPT’s image generation tends to handle face preservation best. Midjourney gives the most cinematic aesthetic. Test on the tool you already use.
The common thread across all five is specificity. Every line in these prompts is doing a job — telling the AI what to keep, what to change, how to light it, what quality to target. That level of detail is what separates a stunning result from a generic one.
Save these, try them one by one, and watch what happens. The first time a blurry old photo comes back sharp, or a plain selfie turns into a cinematic portrait — you’ll get it.